
Dialing In to the UCF Network for Mac OS 8.x
If you want to use your UCF email (Pegasus, PROFS, or Groupwise) or your UCF access to the Internet (such as for Netscape) from your Macintosh at home, you‚ll have to establish a connection called a PPP connection. PPP stands for point-to-point protoc ol.
If your Macintosh is using the Mac OS 8 operating system, it already has the ability to establish a PPP connection as part of the OS. The control panel components you‚ll need are called Modem, TCP/IP, and PPP. If those are not available to you in you r Control Panel, check your Extensions Manager (also a Control Panel component) to see if they might be turned off. If they are not available to you at all, you might need to reinstall your operating system.
Setting Up a PPP Connection
The first time you establish a PPP connection, you‚ll have to do several things to set your dial-in up. After that, it‚s much easier. Here‚s what you do the first time:
1. Go to the Apple Menu and, from the Control Panel, choose TCP/IP.
From the first selection area at the very top, make sure it says "Connect via: PPP." The grey part is the area from which the you can select PPP. Close that window and select Save when asked. You can type in the name server address as show n. It‚s okay if you don‚t see the boxes on the right in your window.
2. Go to the Control Panel again and choose Modem. Select the port to which you have connected your modem (printer or modem port, the modem isn‚t picky). Select the type of modem you have from the list of available drivers. If your modem‚s driver i s not in the list, find the disk(s) that came with it and reinstall the software according to the modem manufacturer‚s directions.
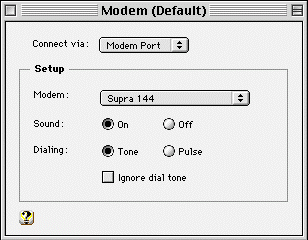
If you don‚t have the disks any more, pick a driver that seems to be of the same speed as your modem (14.4, 28.8, whatever). This might or might not work. If not, get in touch with the modem manufacturer and try to get new drivers.
3. Go to the Apple Menu‚s Control Panel and choose PPP. Here‚s the window you‚ll get:

Click the Options button at the bottom and click on the Protocol tab in the box you‚ll see next.
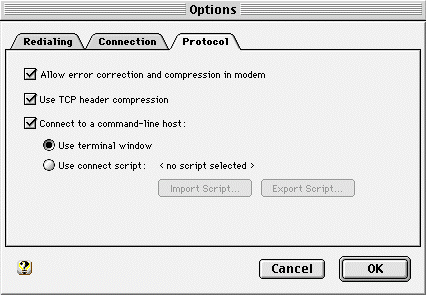
You‚ll want to click check marks into the boxes next to the first three choices listed, then click the radio button next to "Use terminal window."
After that, click on the tab that says "Connection". Check the first box that says "Connect automatically when starting TCP/IP applications." The selection called "Flash icon in menu bar while connected" is usually check ed as a default. This is a good selection to check, because you‚ll always have an indicator of whether your connection is active or not. The other choices are optional.

Once you‚ve done the steps for the Protocol and Connections areas, click the OK button. You‚ll be back at the PPP Control Panel window.
4. Enter your pegasus userID, password, and the phone number to which you want to connect. You‚ll want to select "Registered user" as well. Now you‚re ready to click the Connect button in the lower right.
Note about selecting "Save password": If you save your password here, anyone who can get access to your computer will have dial-in access through your account. No one can figure out your password from the black dots that appear in th e password box, but the dial-in session will be logged as coming from your account‚s access and any activity that occurs during that time might be attributed to you.

5. After you click Connect, the modem will dial and at the bottom of the PPP window you‚ll see your connection status. Once you‚re connected, a terminal window will come up. It might be blank for a minute; that‚s okay. The prompts will come up in a moment.
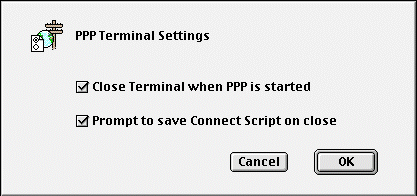
Before you respond to the prompts, click on the button in the lower left of the window that says "Settings." Click check marks next to both "Close terminal when PPP is started" and "Prompt to save Connect Script on close." ;
In the terminal window, you will be asked for your username and then your password. After that you‚ll get a strange string of characters that might look like "as5200"; it can vary. It will be followed by a > After this, type PPP and pre ss the Return key.

This will establish your PPP connection. The terminal window will close once the connection is established. You‚ll be asked if you want to save the document as a connect script. You do. Name it and save it some place you will remember.
6. Go back to your PPP Control Panel again. Click on Options in the lower left. From the tabs, choose Protocol. Choose the radio button that says "Use connect script."
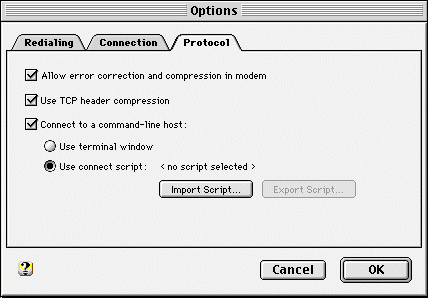
The button that says "Import script" will now be available to click, so click it, and navigate through the selection box to where you saved that connect script just a minute ago. When you find it, click open in the find window.
7. You can now close your PPP Control Panel window. You‚ll be asked if you want to save your changes: you do.
From now on, all you have to do to connect to Pegasus or Netscape (or PROFs or GroupWise) just open the application (such as Netscape) or double-click on the document you have for your Pegasus session. This will start up the PPP dial-in process.
REMEMBER TO DISCONNECT WHEN YOU ARE DONE. You can do this using the Disconnect button on the PPP Control Panel window (the Connect button becomes Disconnect once you‚ve dialed in).
While you‚re dialed in, the apple in the far left of your menu bar will blink with a little picture of a telephone pole and a computer. This lets you know you are connected through dial-in.